|
#1
●
04-27-2014, 01:16 AM
| ||||||||
| ★ ********* ★ Poster Rank:247 Male Join Date: Jul 2009 Posts: 5,565 Mentioned: 66 Post(s) Quoted: 932 Post(s)
| ||||||||
|
The Forensic Examination and Autopsy
Types of Autopsies An autopsy, necropsy, or postmortem examination is a completesurgical examination of a body after death. There are generally two types of autopsies: forensic or medicolegal autopsies and hospital or medical autopsies. Medicolegal autopsies differ from hospital autopsies in that they fall under the jurisdiction of a local governmental death investigation office (typically a coroner or a medical examiner). A coroner or medical examiner may legally order an autopsy and does not require consent from the legal next-of-kin. This contrasts with hospital autopsies where a properly executed and witnessed consent for autopsy that has been signed by the decedent’s legal next-of-kin is required before an autopsy can be performed. The cause of death in medical autopsies is often already known and so the purpose of the autopsy is more an attempt to answer specific questions that family members or physicians may have regarding the case. This includes questions on the extent of disease, the effectiveness of therapy, or the presence or absence of other findings. In view of the focused nature of the questions, hospital autopsies may therefore be limited to an examination of certain body parts or particular organs. 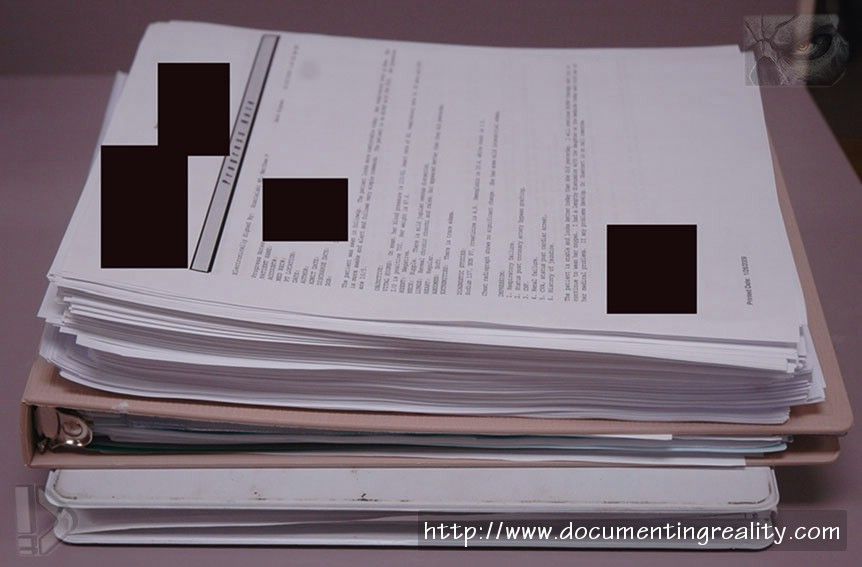 Fig. 7.1 Hospital records are typically available for review prior to hospital autopsies 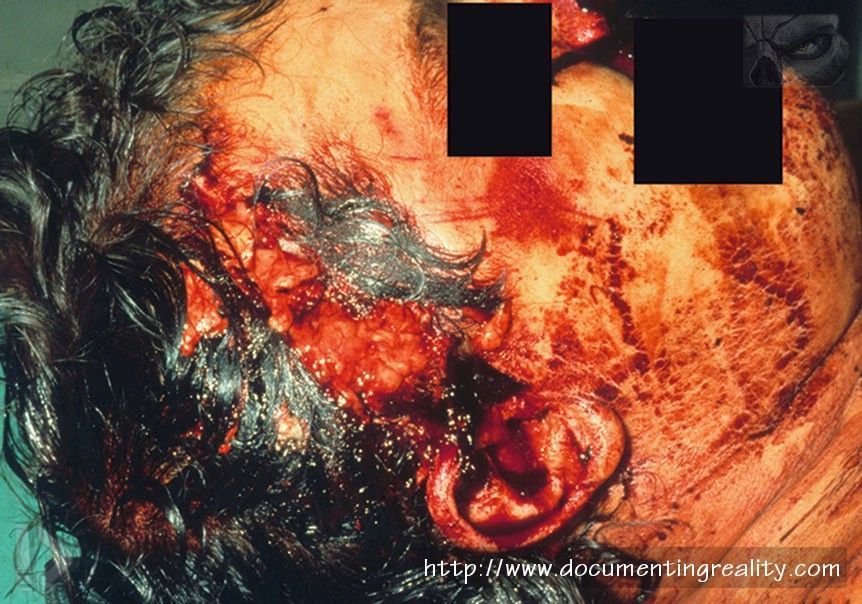 Fig. 7.2 An example of how blood can obscure the true nature of an injury. In this photograph of a man with a gunshot wound of the head, it is impossible to identify the site of the wound 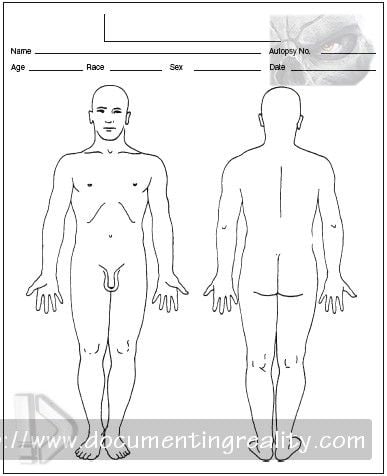 Fig. 7.3 An example of a typical body diagram used to document injuries at autopsy  Fig. 7.4 Radiography is now commonly used in many types of forensic cases 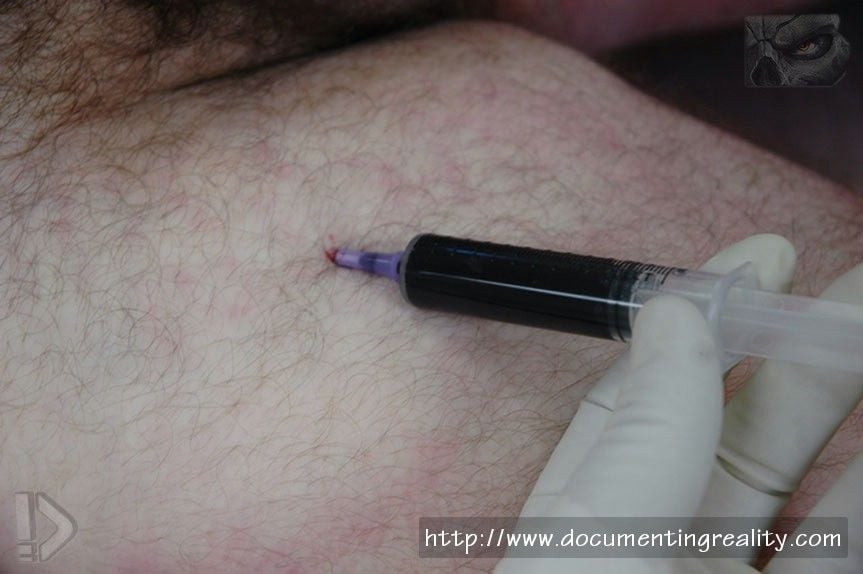 Fig. 7.5 Collection of blood from the femoral region (groin) is the preferred site for postmortem toxicology testing 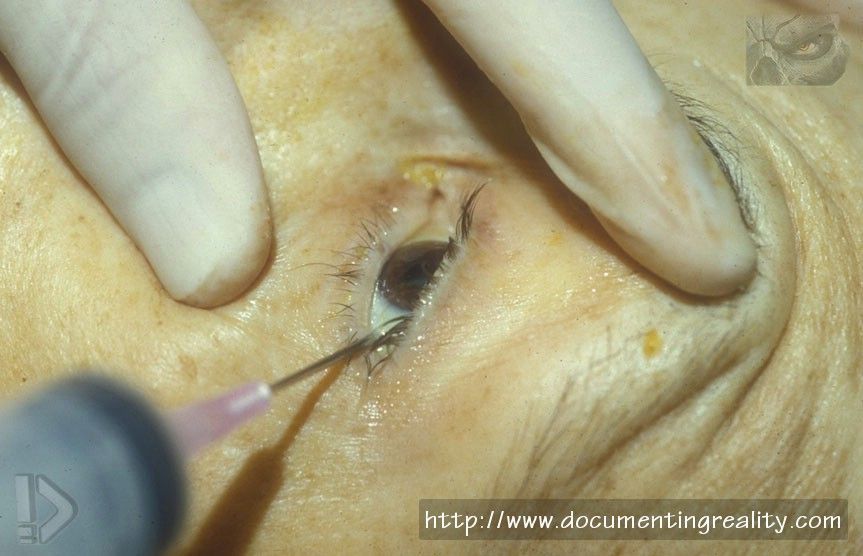 Fig. 7.6 Collection of vitreous fluid from the eye can provide important toxicology and chemistry information related to the cause of death 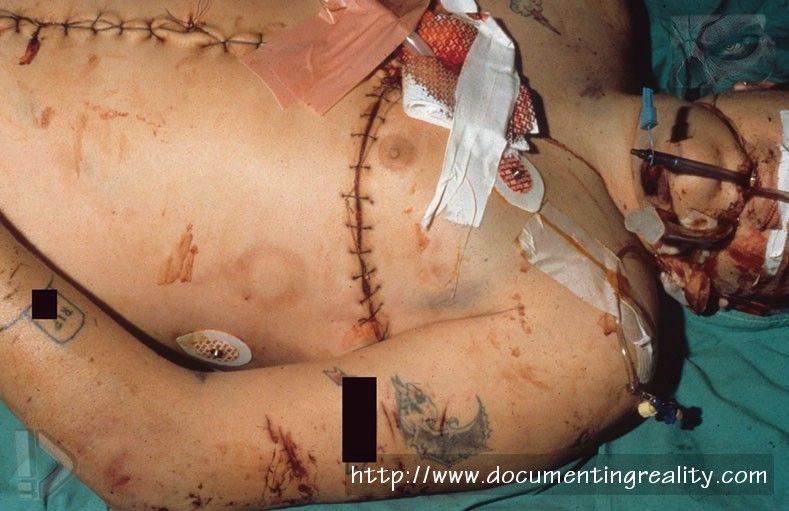 Fig. 7.7 The external examination is of extreme importance in forensic autopsies. Pathologists must document clothing, medical treatment, identifying features, and injuries 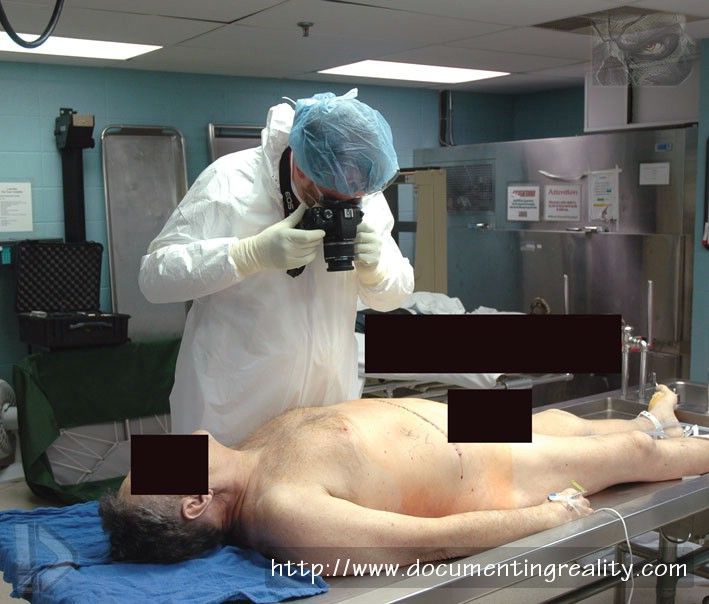 Fig. 7.8 Photography is an integral part of forensic autopsies 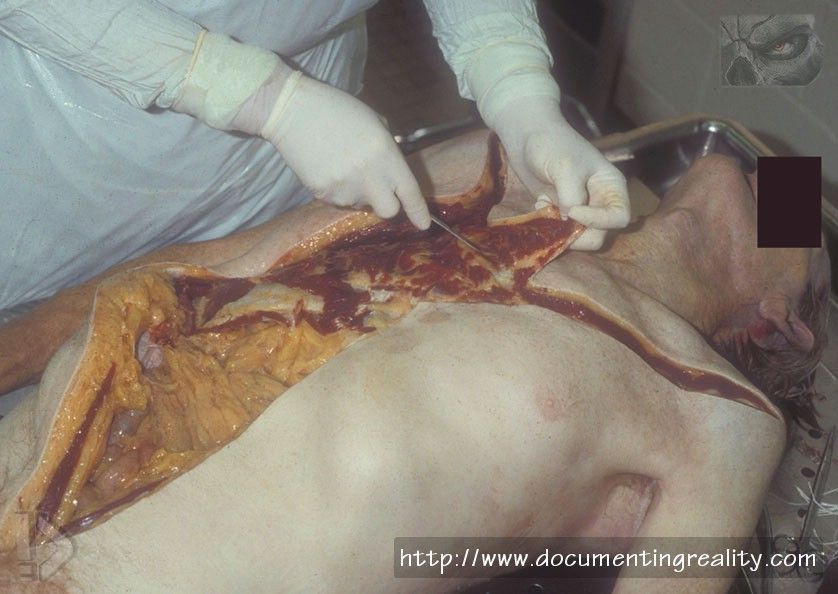 Fig. 7.9 The classic ‘‘Y-shaped’’ incision used during the performance of an autopsy 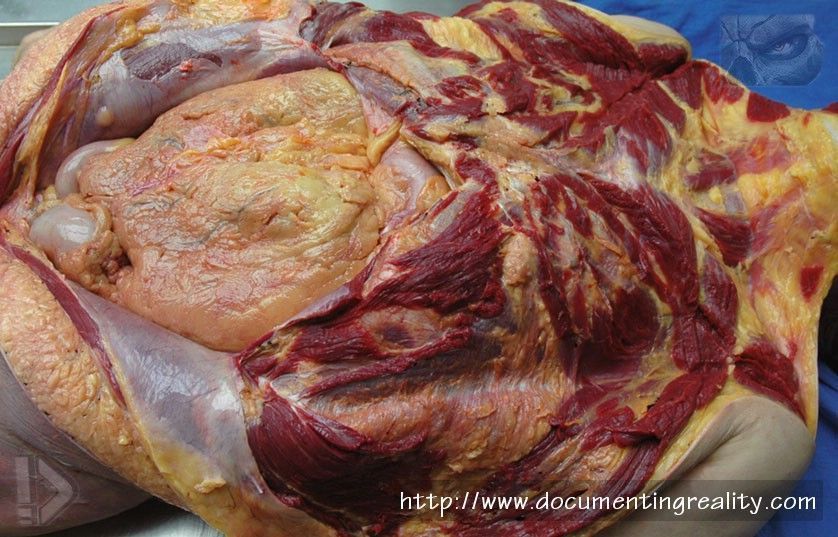 Fig. 7.10 The skin and underlying subcutaneous tissues are reflected, thus exposing the anterior (front) chest wall, as well as the opened abdominal (peritoneal) cavity. In this photograph, the omentum as well as small portions of the stomach and intestines are visible 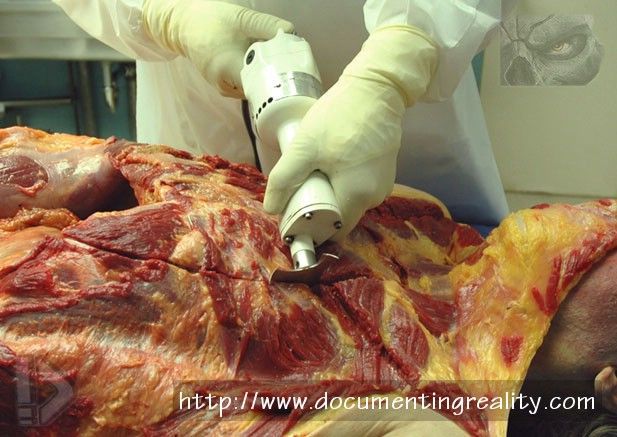 Fig. 7.11 A bone saw can be used to cut the front of the chest plate  Fig. 7.12 In young individuals, such as this infant, the anterior chest plate can be removed by cutting through the rib (costal) cartilage with a scalpel 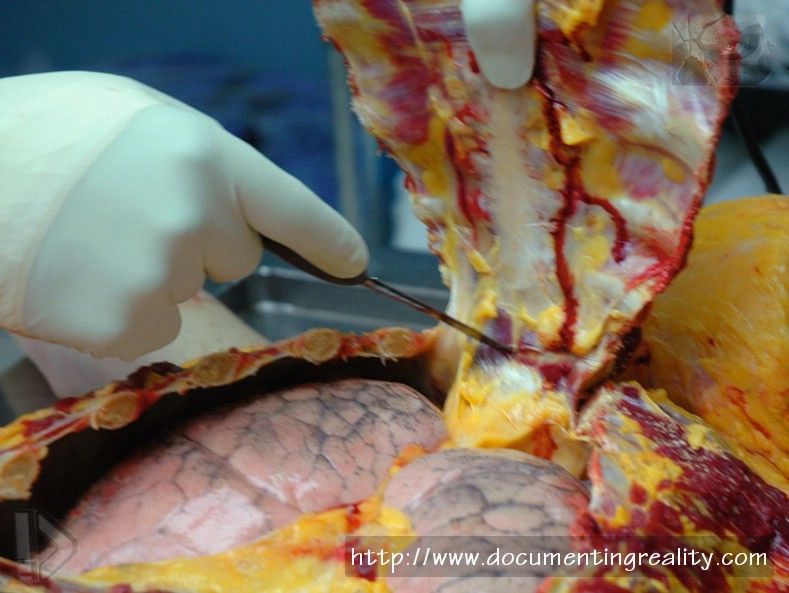 Fig. 7.13 The chest plate is removed, exposing the pleural cavities (containing the lungs) and the front of the pericardial sac 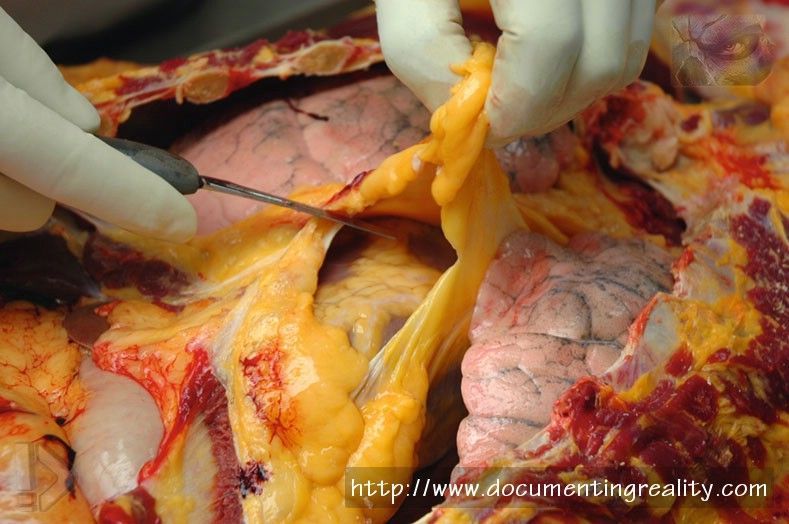 Fig. 7.14 After the chest plate is removed and the pleural cavities and lungs are examined in situ (in place), the pericardial sac can be opened anteriorly to reveal the heart. Organs can be removed together (en bloc) and then dissected, or they can be removed one at a time  Fig. 7.15 Blood samples can be collected directly from the heart, although for toxicological interpretation peripheral blood from the extremities is preferable 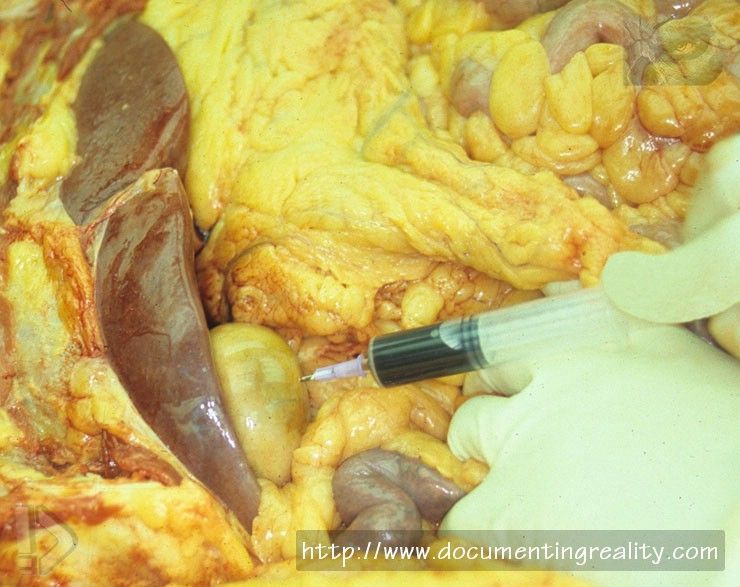 Fig. 7.16 Bile can be collected from the gallbladder 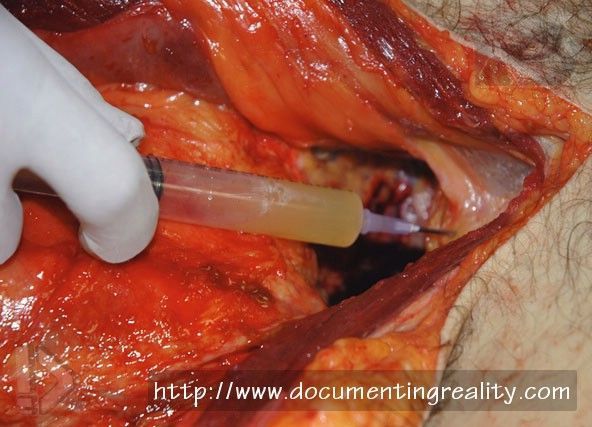 Fig. 7.17 Urine can be collected from the urinary bladder  Fig. 7.18 The small intestines may be removed in one large block by cutting the base of the mesentery at the posterior (back) of the abdominal cavity 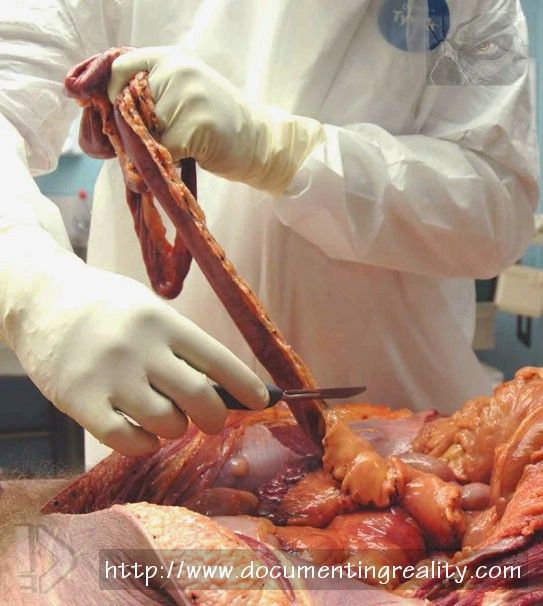 Fig. 7.19 Alternatively, and preferably, the small intestines may be removed by cutting the mesenteric attachment immediately adjacent to intestine. Removal in this fashion allows the intestine to be more easily opened and examined internally 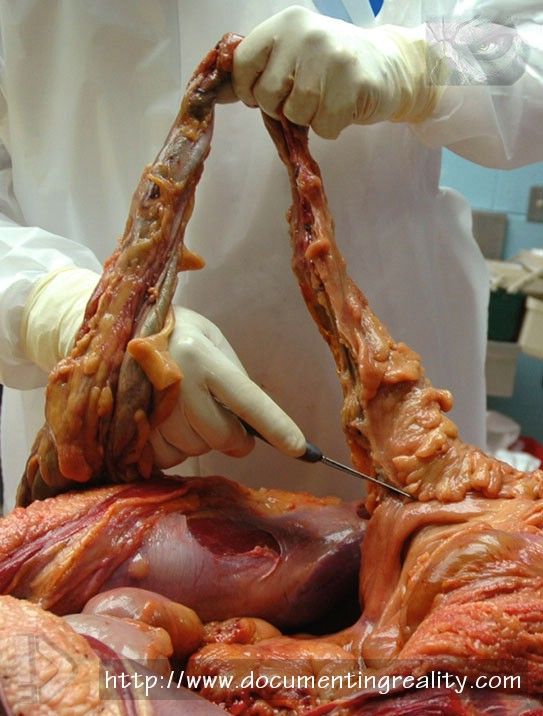 Fig. 7.20 After the small intestine has been taken out of the abdominal cavity the large intestine is removed 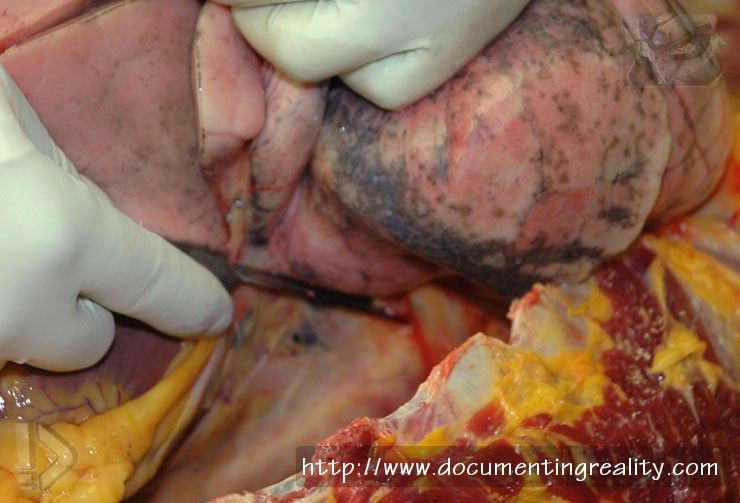 Fig. 7.21 When organs are removed individually, the lungs can be pulled forward and removed by cutting the mainstem bronchi and the pulmonary arteries and veins. In this photograph, the left lung is being removed 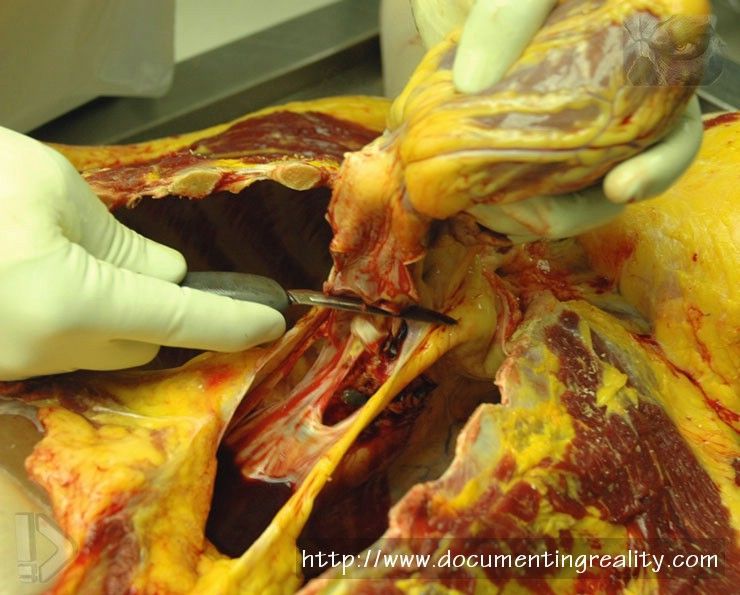 Fig. 7.22 The heart is pulled forward (upward) and removed by cutting the inferior vena cava, the pulmonary veins, the pulmonary artery and aorta, and the superior vena cava  Fig. 7.23 The liver must be cut away from the diaphragm, as well as the inferior vena cava and biliary system, in order to remove it from the body 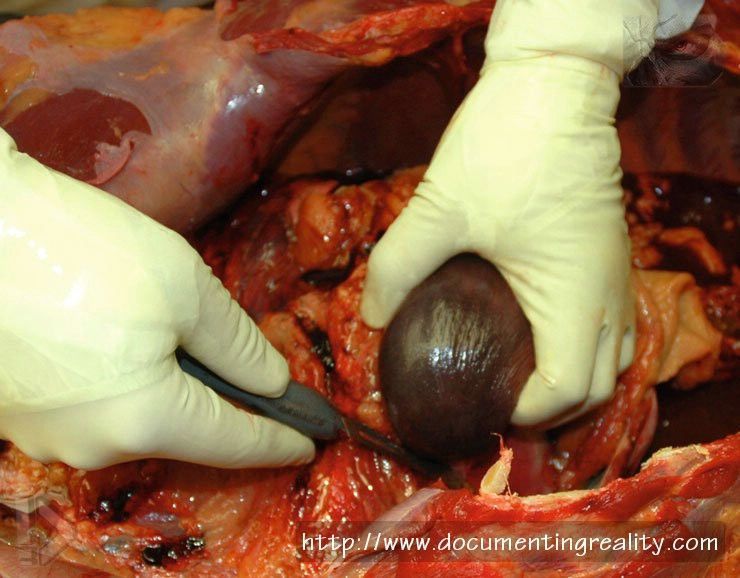 Fig. 7.24 The spleen is reflected forward and cut away from the region near the tail of the pancreas 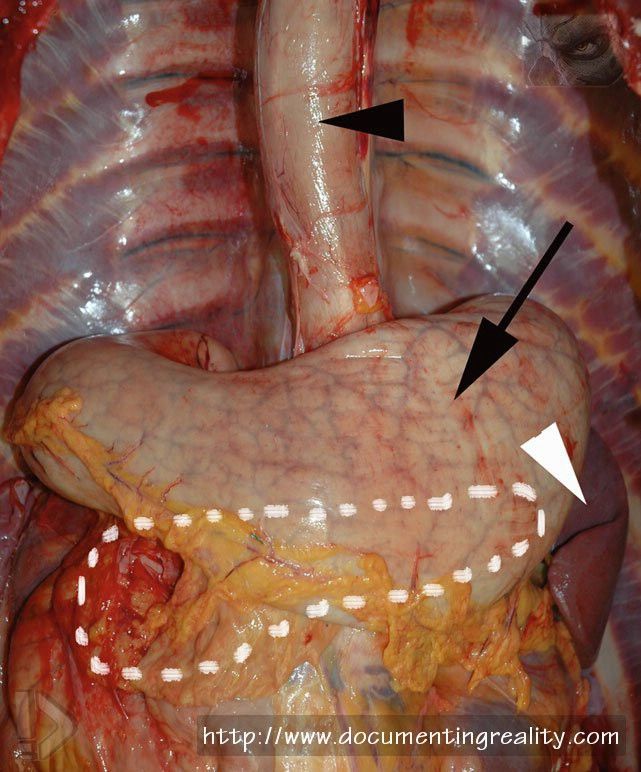 Fig. 7.25 After the liver and most of the intestines have been removed, the spleen (white arrowhead), esophagus (black arrowhead), stomach (arrow), duodenum, and pancreas (located behind the stomach – dashed outline) remain within the body. These organs may be removed in a variety of ways. Often, the spleen is removed separately, followed by removal of the other organs together  Fig. 7.26 The duodenum, the pancreas, the stomach, and a portion of the esophagus may be removed in one large organ block 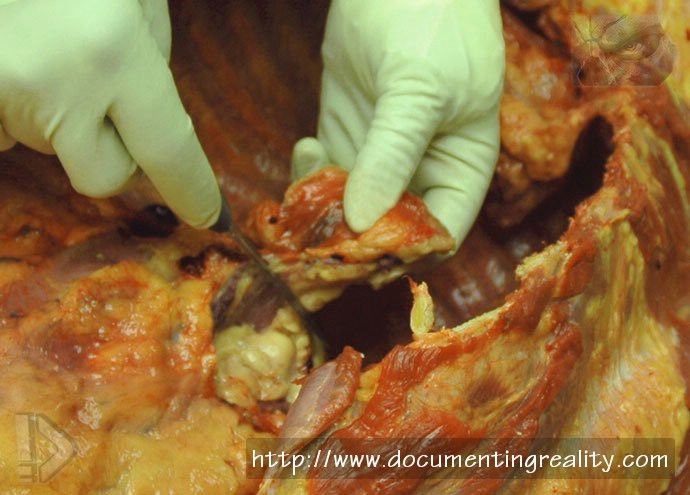 Fig. 7.27 The adrenal glands, located above and medial to the kidneys, are removed. The left adrenal gland is being excised in this photograph 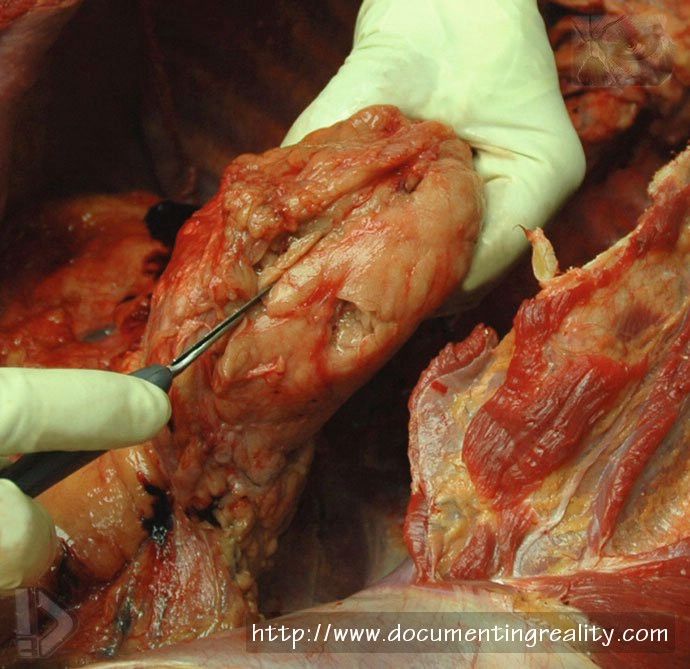 Fig. 7.28 In order to remove a kidney, it is reflected forward, and a scalpel is used to cut through the fat surrounding the organ 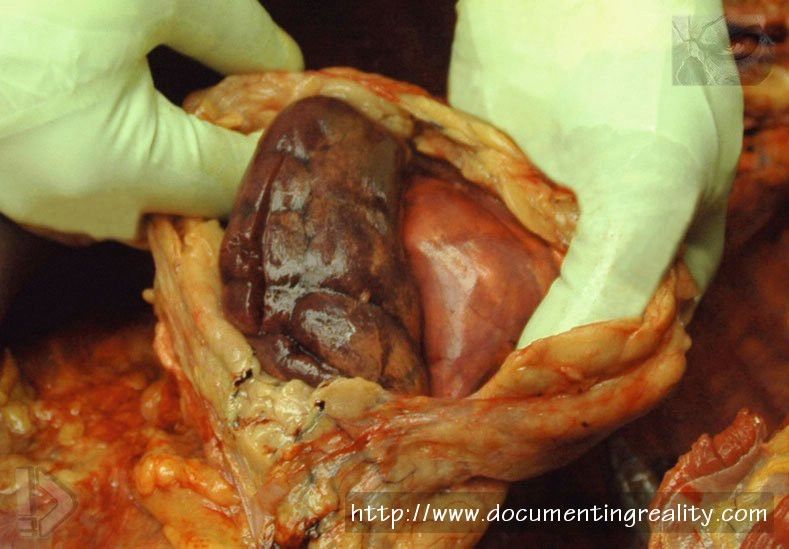 Fig. 7.29 After the kidney is exposed, as shown in Fig. 28, the capsule and surrounding fat is peeled away 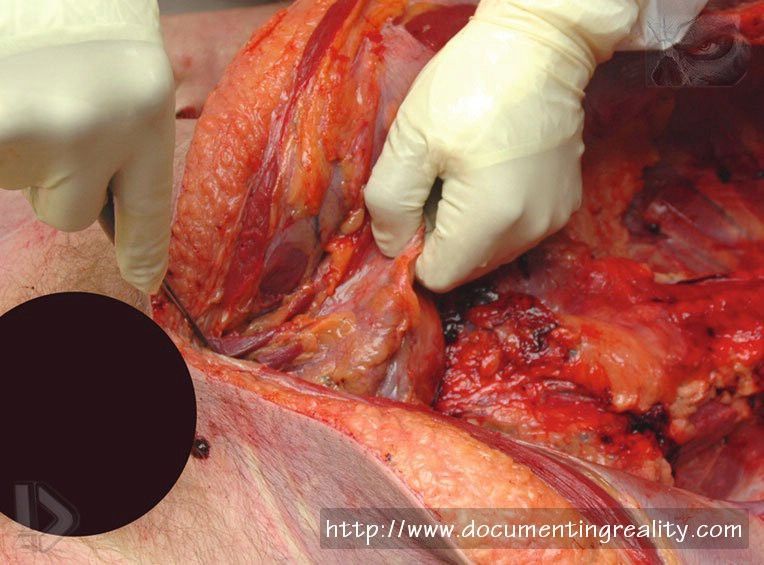 Fig. 7.30 The pelvic organs (urinary bladder, as well as the prostate in males as shown, and the uterus, fallopian tubes, and ovaries in females) are then removed 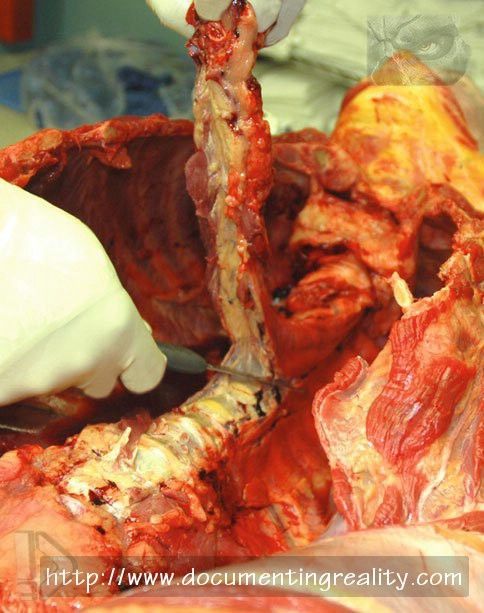 Fig. 7.31 The aorta, along with the bottom portion of the trachea, with attached mainstem bronchi, can then be removed 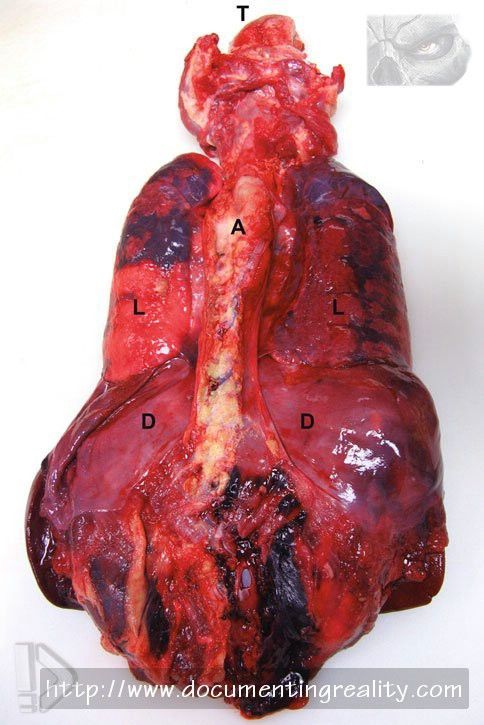 Fig. 7.32 Examination of the organ block from behind shows the tongue (T), aorta (A), lungs (L), and domes of the diaphragm (D) 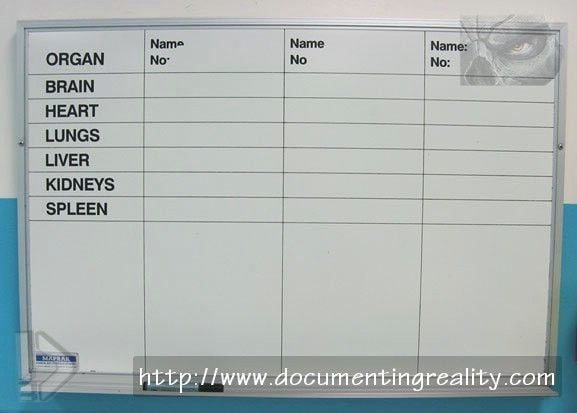 Fig. 7.33 Individual organ weights are recorded during the autopsy  Fig. 7.34 The brain being weighed 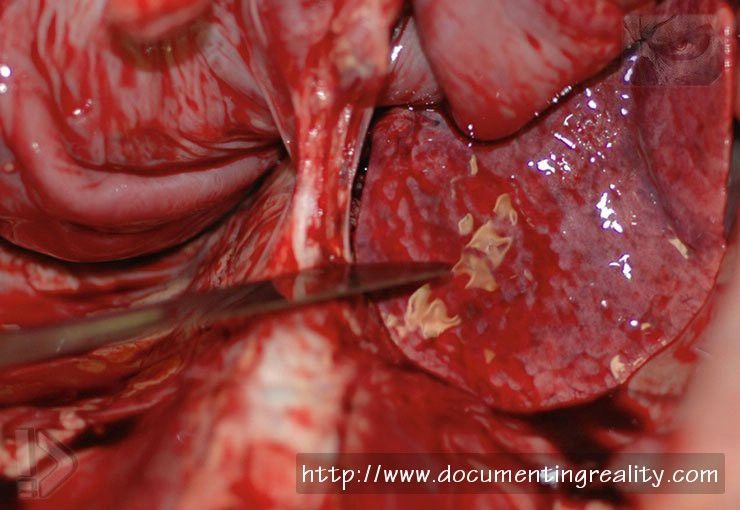 Fig. 7.35 In this infant case, the organ bloc has been freed posteriorly, first on the right, then on the left, then from below, and finally from above (as shown) 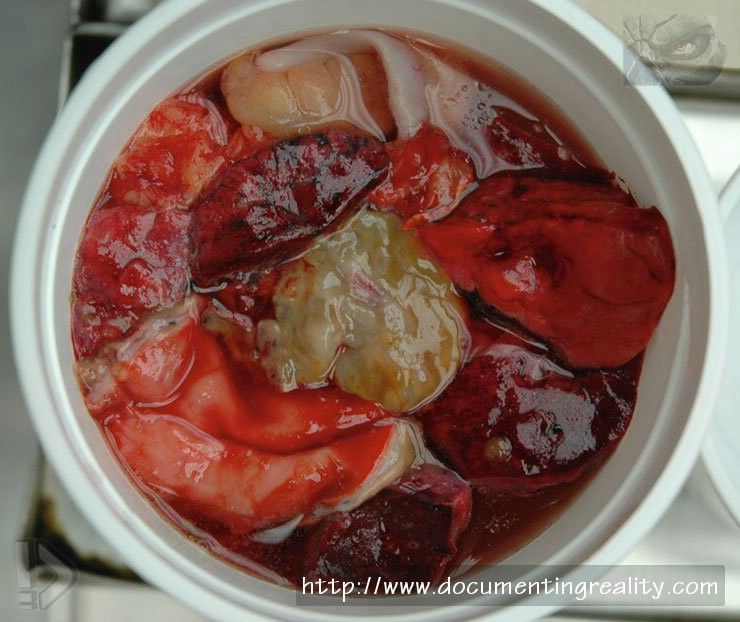 Fig. 7.36 A stock container with representative tissue/organ samples in formalin (viewed from above) 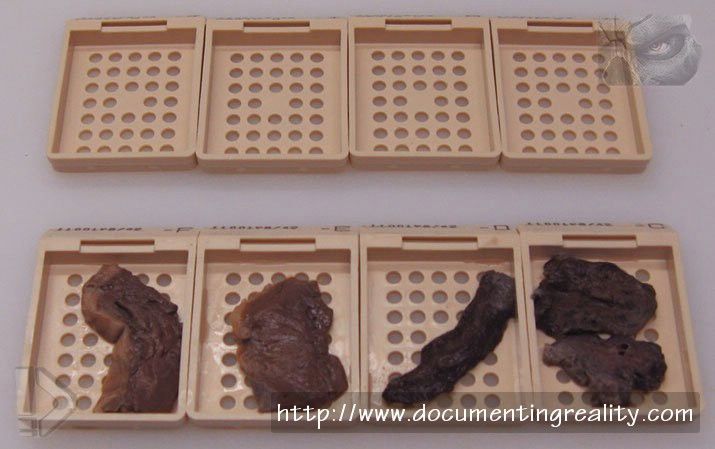 Fig. 7.37 Small sections of tissues can be placed into tissue cassettes, so that microscopic sections can be prepared  Fig. 7.38 Examination of the removed heart includes serially sectioning the major coronary arteries that are located within the epicardial fat. The anterior surface (front) of the heart can be seen, with a series of cuts through one of the main coronary arteries (the left anterior descending) 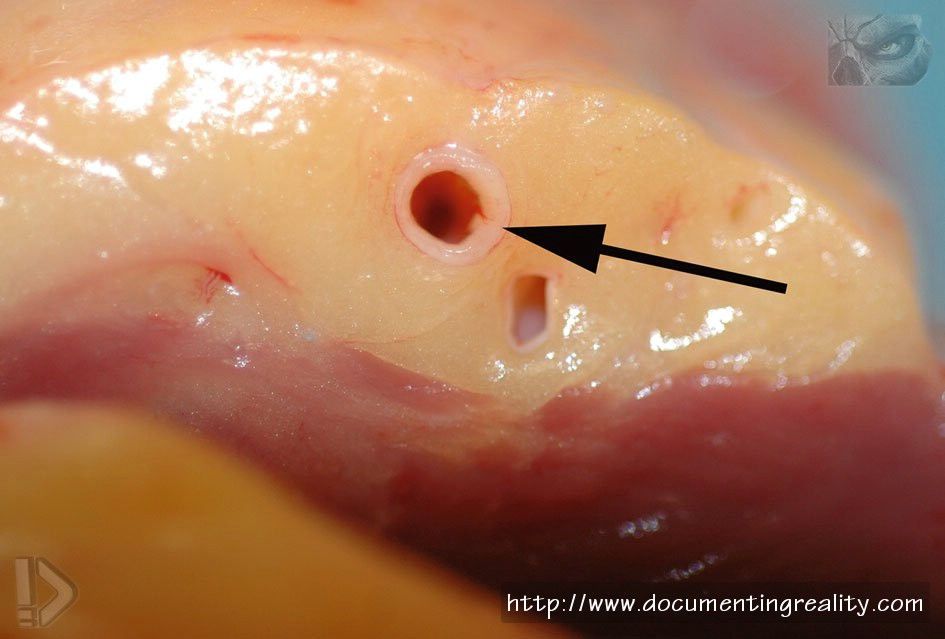 Fig. 7.39 A cross section of epicardial fat with a coronary artery (arrow) and adjacent vein 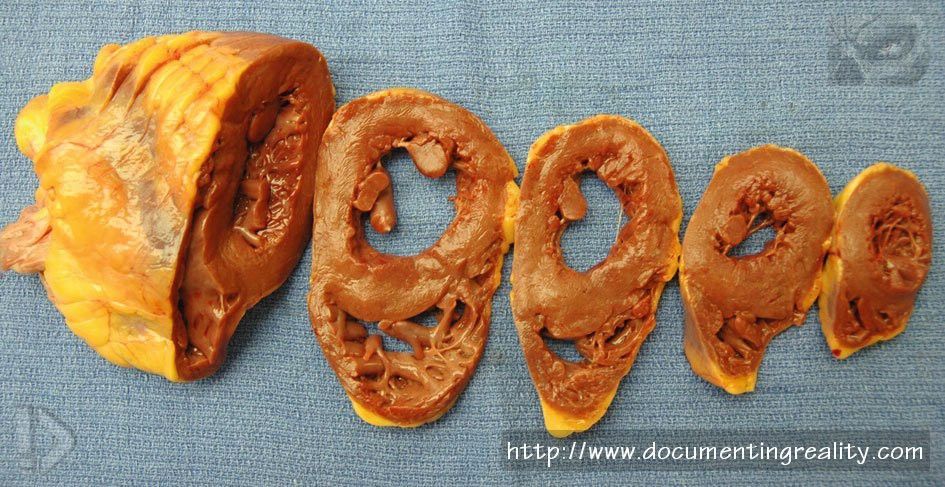 Fig. 7.40 Following serial sectioning of the coronary arteries, the heart is also sectioned, beginning at the apex (the lowermost tip) and moving toward the base (where all of the blood vessels connect)  Fig. 7.41 Examination of the lung includes serially sectioning the organ 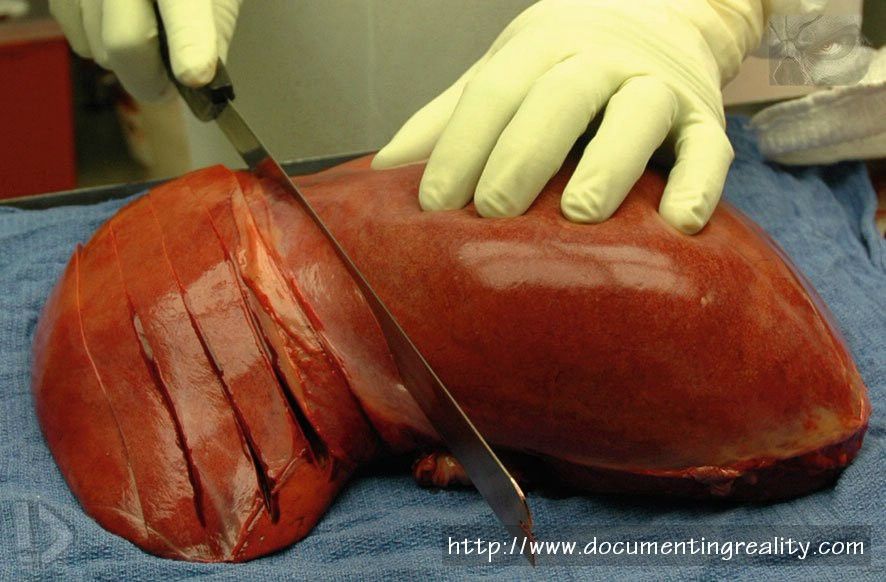 Fig. 7.42 Examination of the liver also involves serially sectioning the organ 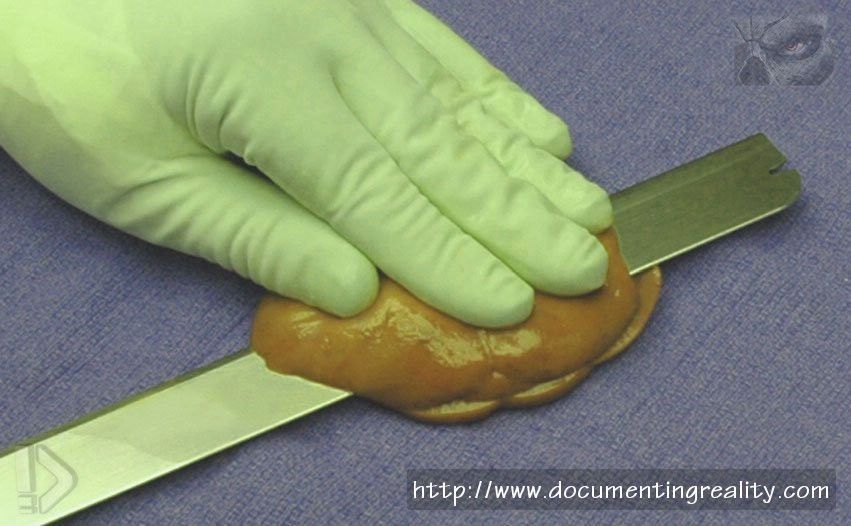 Fig. 7.43 Examination of the kidney involves cutting the organ in half longitudinally 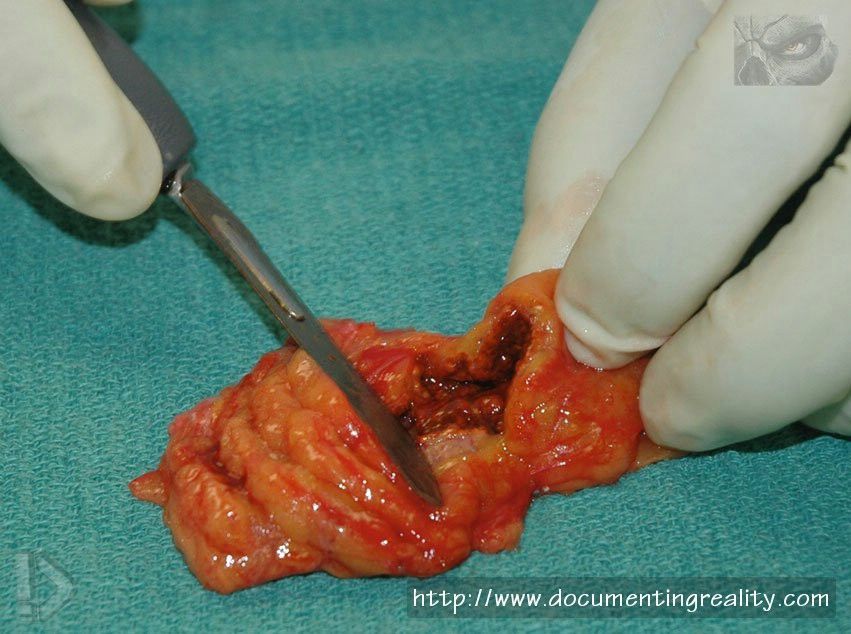 Fig. 7.44 Sectioning of the adrenal gland 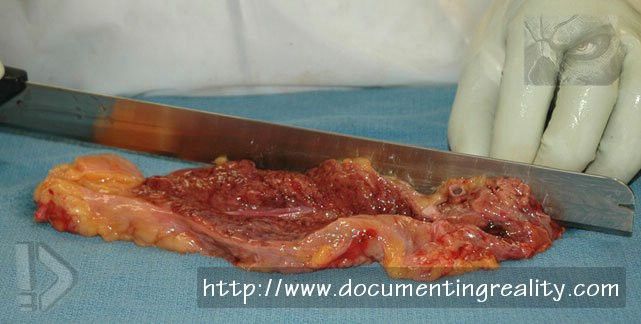 Fig. 7.45 Sectioning of the pancreas 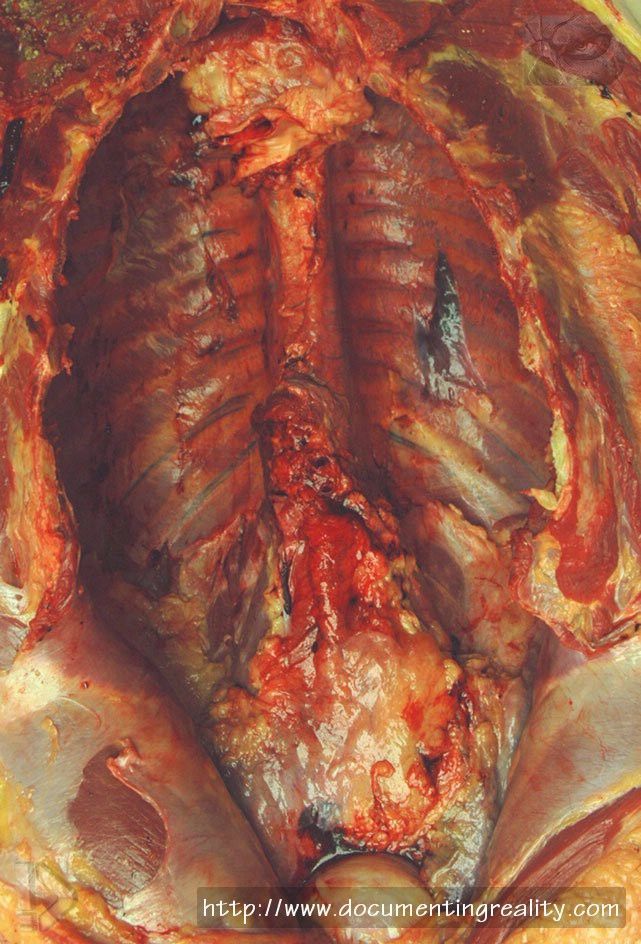 Fig. 7.46 After the trunk organs and diaphragm have been removed, the trunk appears to be one large cavity 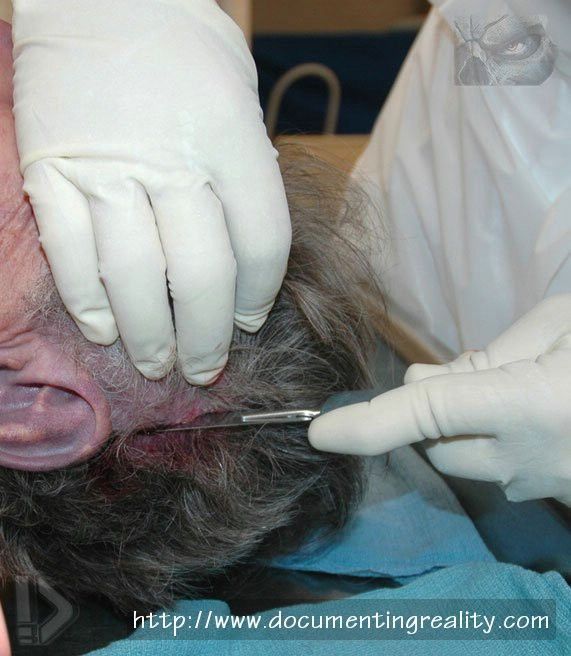 Fig. 7.47 The initial step required for brain removal includes making an incision from behind one ear, across the top of the scalp, to behind the opposite ear 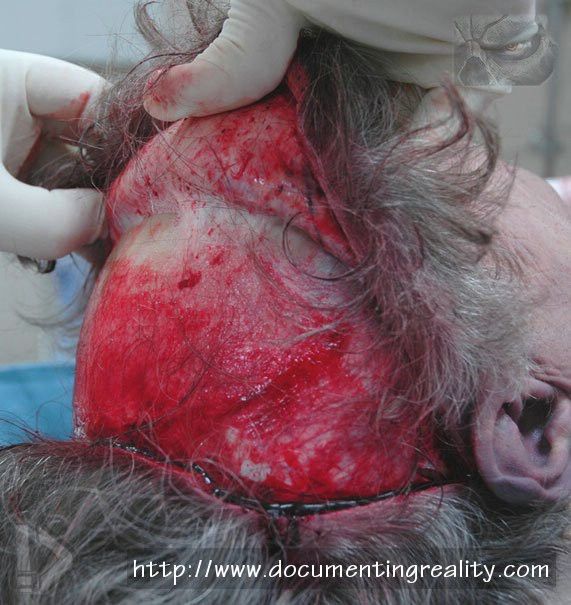 Fig. 7.48 The scalp is then reflected forward, exposing the underlying skull  Fig. 7.49 After the scalp has been reflected forward, the decedent’s face will be temporarily covered by the ‘‘inside-out’’ scalp 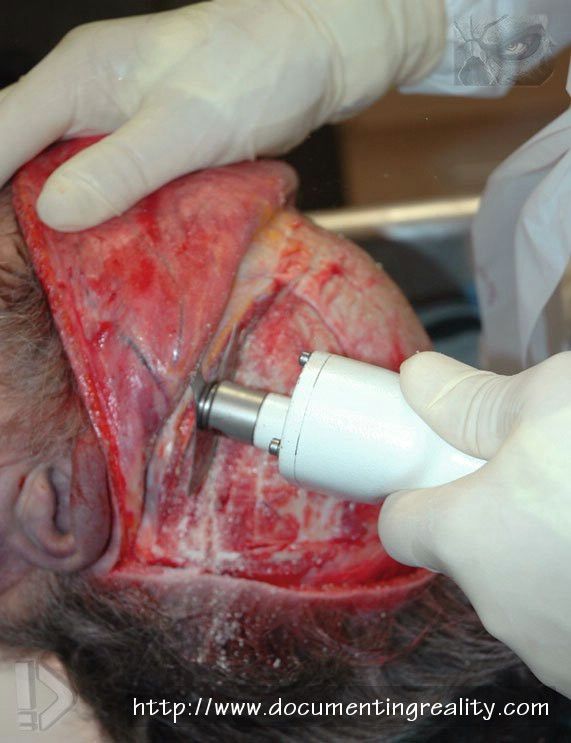 Fig. 7.50 A bone saw is used to cut out a piece of skull, thus allowing access to the underlying brain 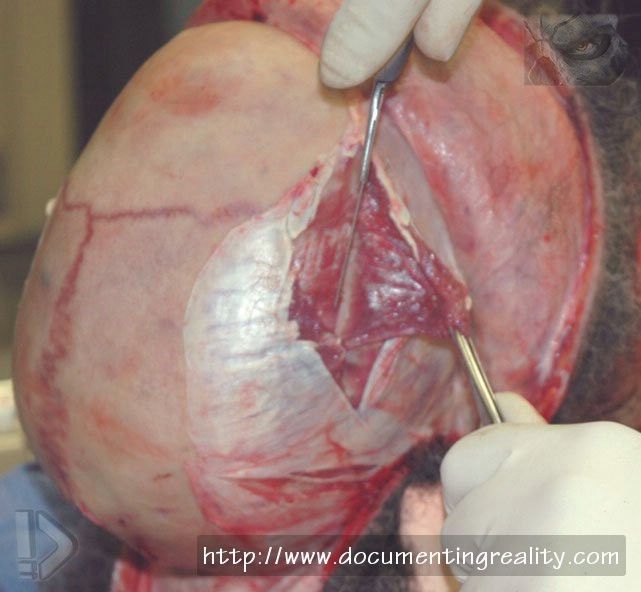 Fig. 7.51 Depending on the case or office protocol, the temporalis muscles on the side of the skull can be trimmed away from the underlying skull, in order to better visualize the bone 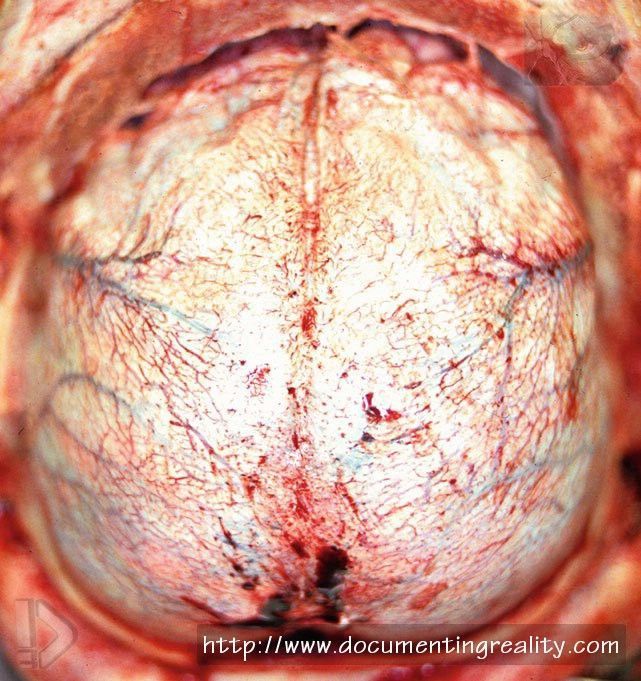 Fig. 7.52 In some instances, the bone can be removed without disturbing the underlying dura. In such cases, the skullcap actually peels off the dura as it is being removed 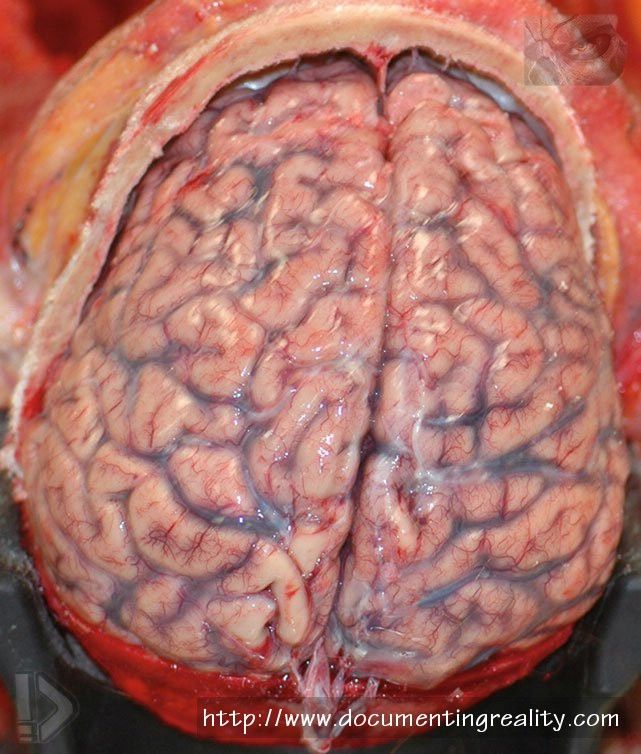 Fig. 7.53 In other cases, the dura remains adherent to the inner aspect of the skullcap so that when the skull is removed, the dura is also removed, thus exposing the underlying brain 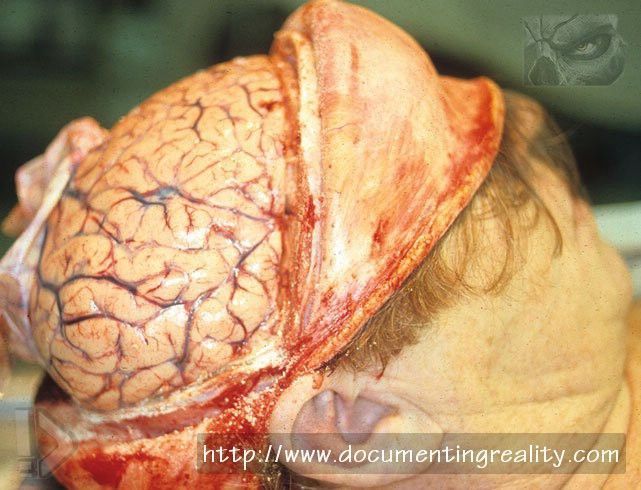 Fig. 7.54 After the skullcap and dura have been removed, the brain is exposed and ready for removal from the cranial cavity 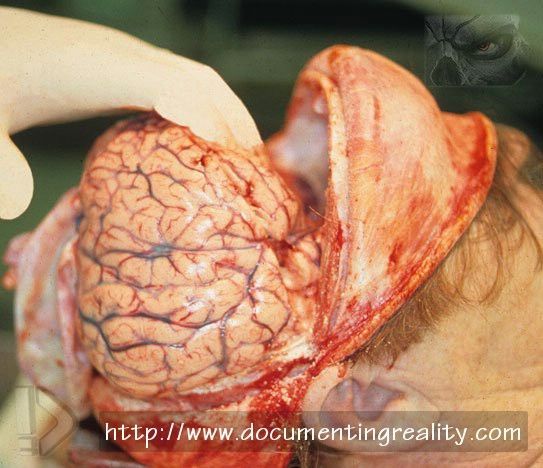 Fig. 7.55 In order to remove the brain, it must be gently pulled back, in order to cut the portion of the dura that separates the cerebrum from the underlying cerebellum (the ‘‘tentorium’’). This is followed by cutting of the optic nerves, the pituitary stalk, the carotid arteries, the vertebral arteries, and the upper cervical spinal cord 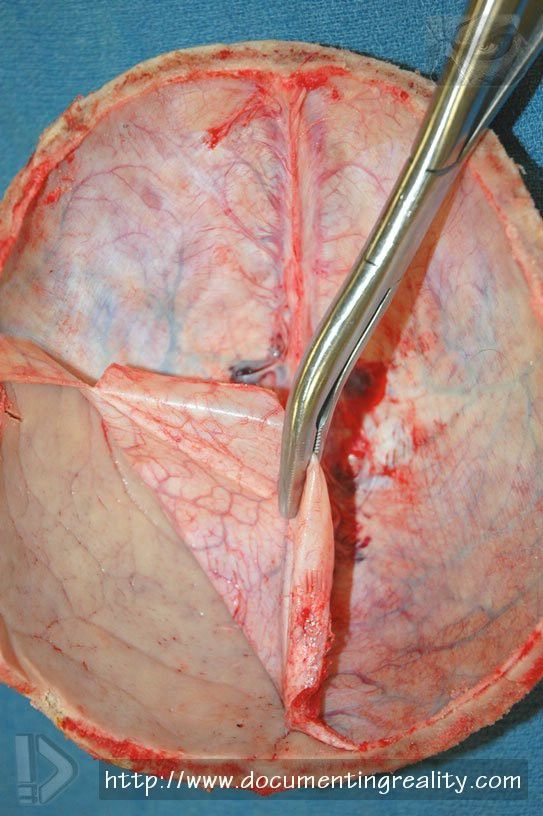 Fig. 7.56 After the brain has been removed, it is important to remove the adherent dura from the inner aspect of the skull to check for any fractures or hemorrhage 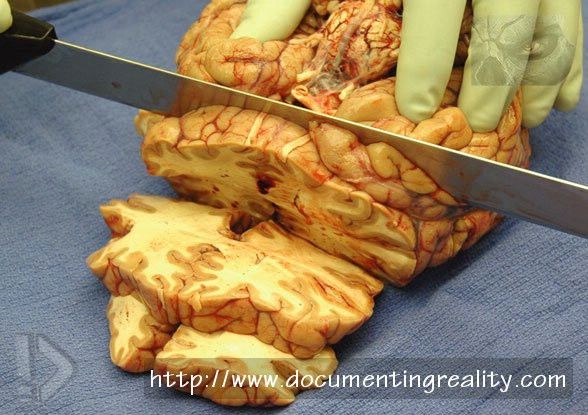 Fig. 7.57 The brain is examined and is usually serially sectioned in the ‘‘fresh’’ (non-fixed) state, although in some cases the brain may be fixed in formalin prior to sectioning, as fixation considerably improves the ability to dissect brain tissue 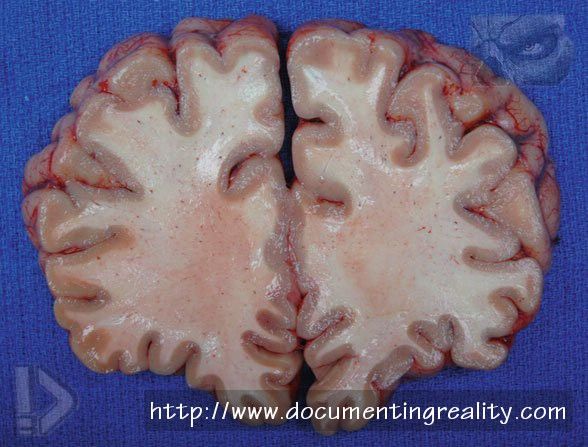 Fig. 7.58 A cross section of ‘‘fresh’’ (non-fixed) brain at autopsy clearly showing symmetrical gray and white matter with cortical foldings (gyri and sulci) 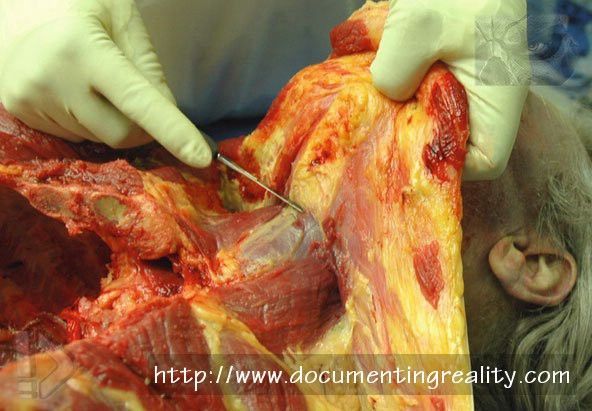 Fig. 7.59 Examination of the anterior (front) of the neck typically includes removal of the trachea, the larynx, and the thyroid gland 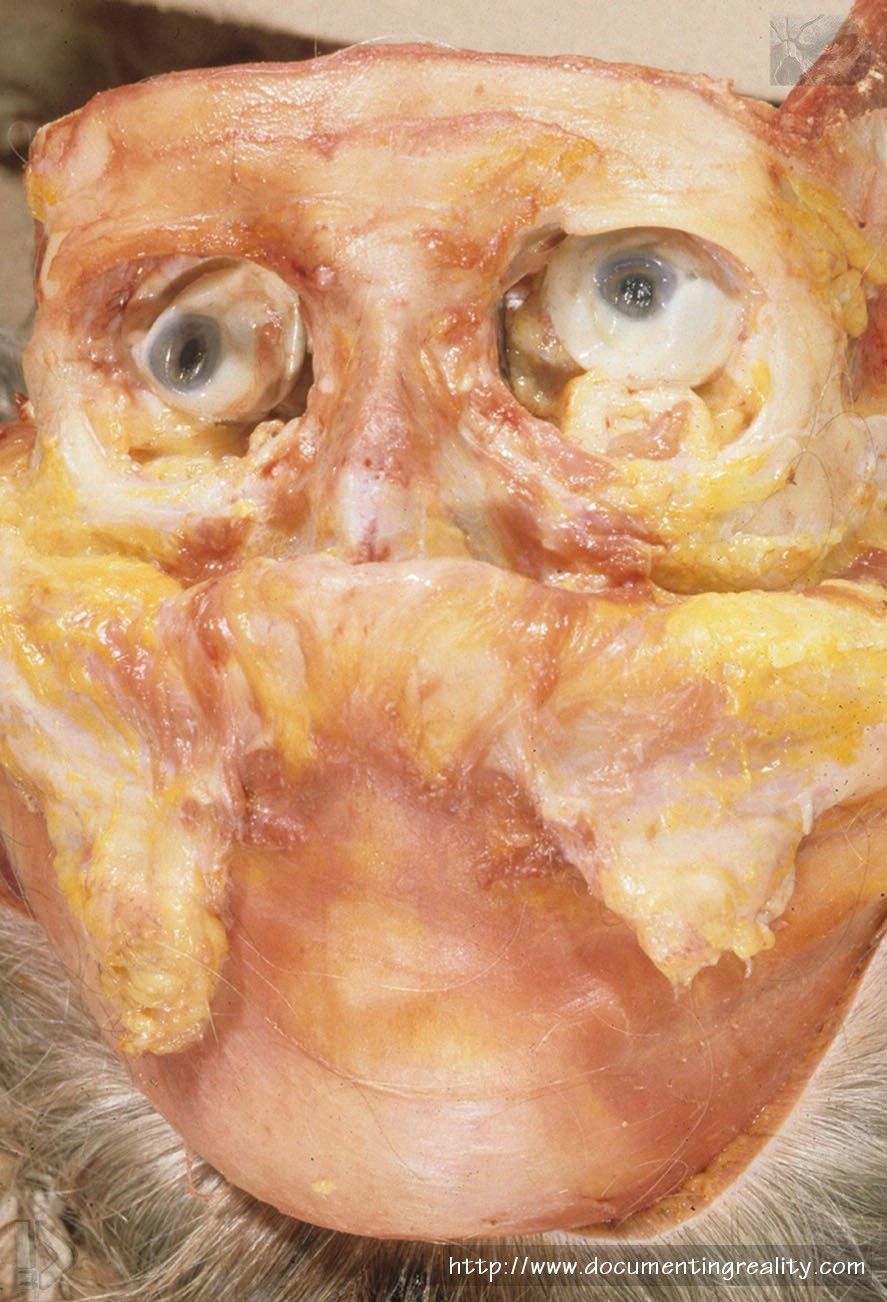 Fig. 7.60 When injury to the face is suspected, special dissection is required with removal of the soft tissues of the face from the underlying skeleton. Here the face has been peeled downward, leaving the eyes in their sockets (orbits) 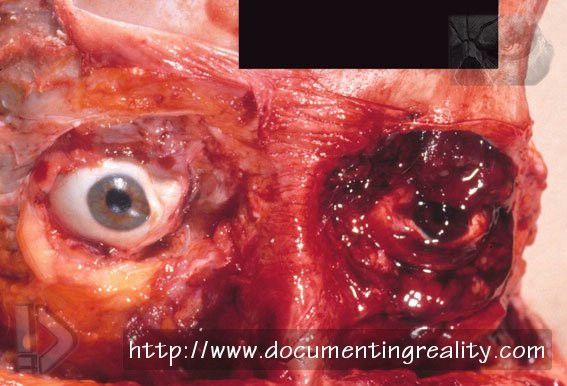 Fig. 7.61 Face peel-down examination showing injury of and around the left eye with bleeding (hemorrhage) 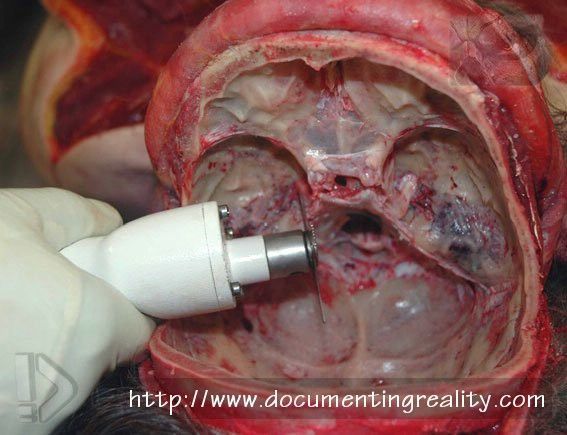 Fig. 7.62 Middle/inner ear removal via the base of the skull 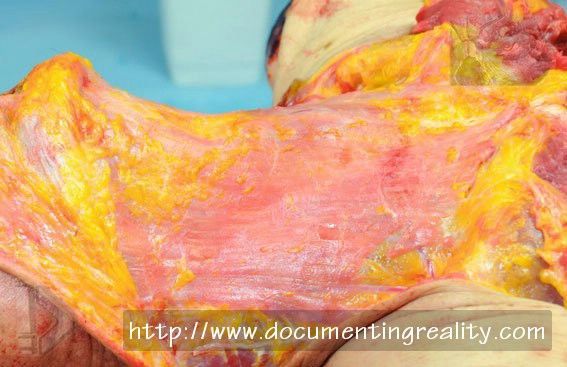 Fig. 7.63 Layer-by-layer anterior neck dissection commencing with a dissection of the skin off the platysma muscle 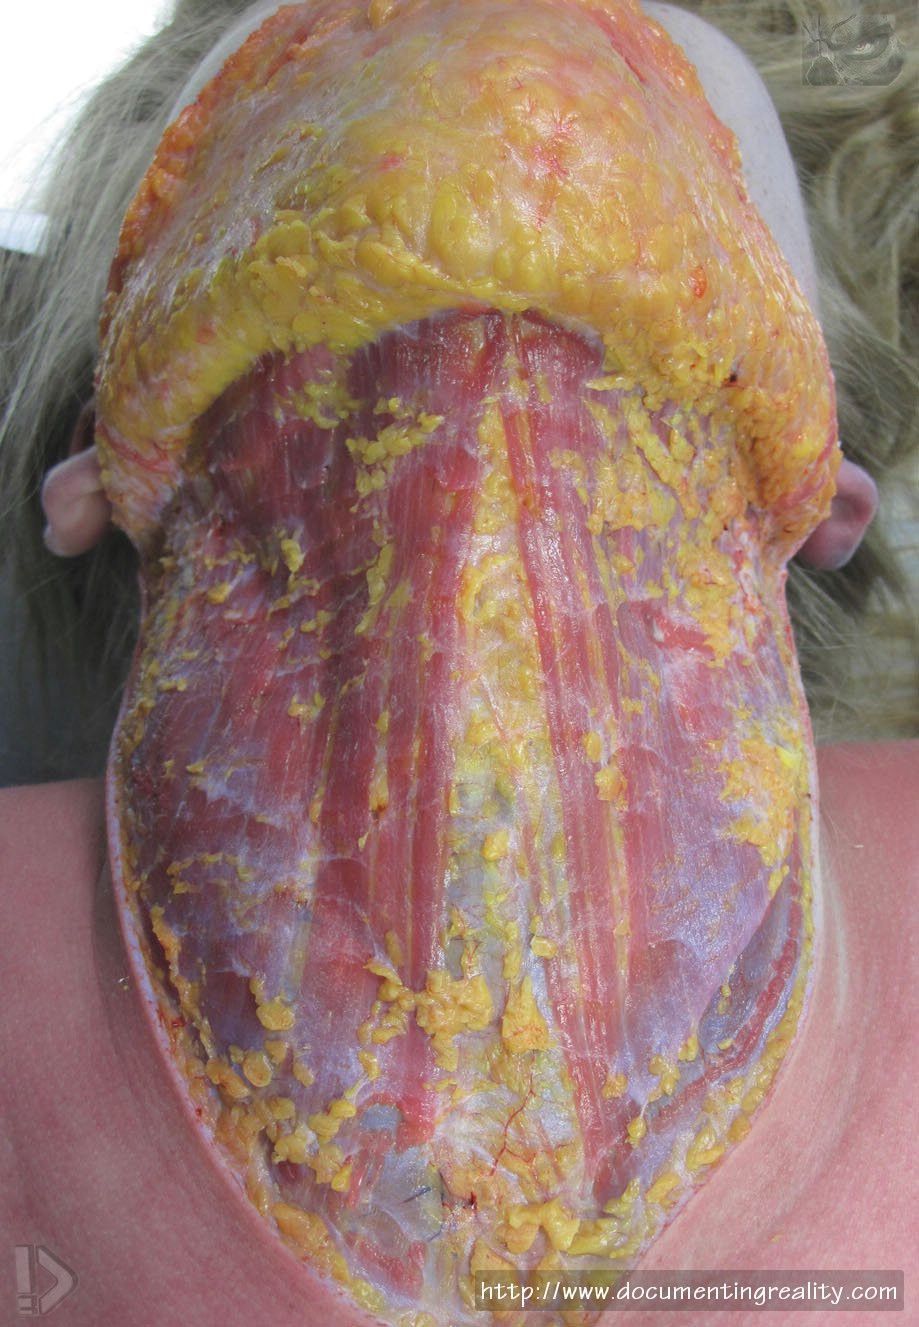 Fig. 7.64 A frontal view of the superficial platysma muscle. In this case, there is no evidence of injury 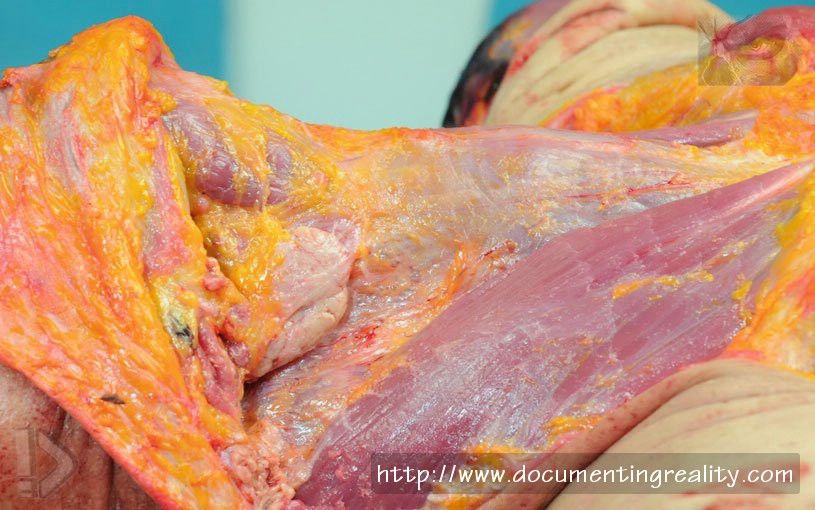 Fig. 7.65 Removal of the platysma reveals the underlying sternomastoid muscle at the side of the neck and also the pale submandibular salivary gland in the center left of the field 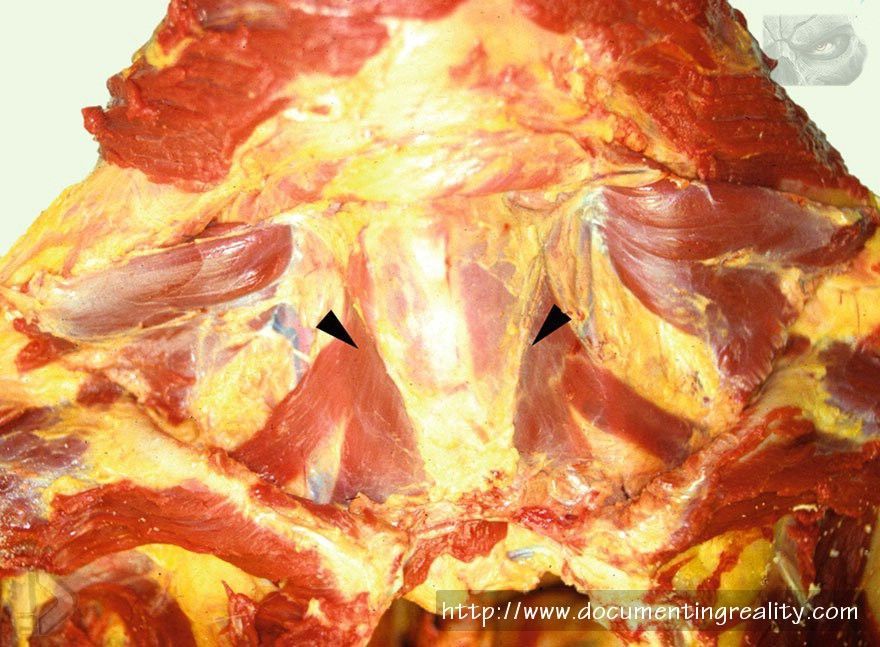 Fig. 7.66 An anterior neck dissection in progress, at a level deeper than Fig. 64, beneath the platysma muscle. The arrowheads indicate the sternohyoid muscles 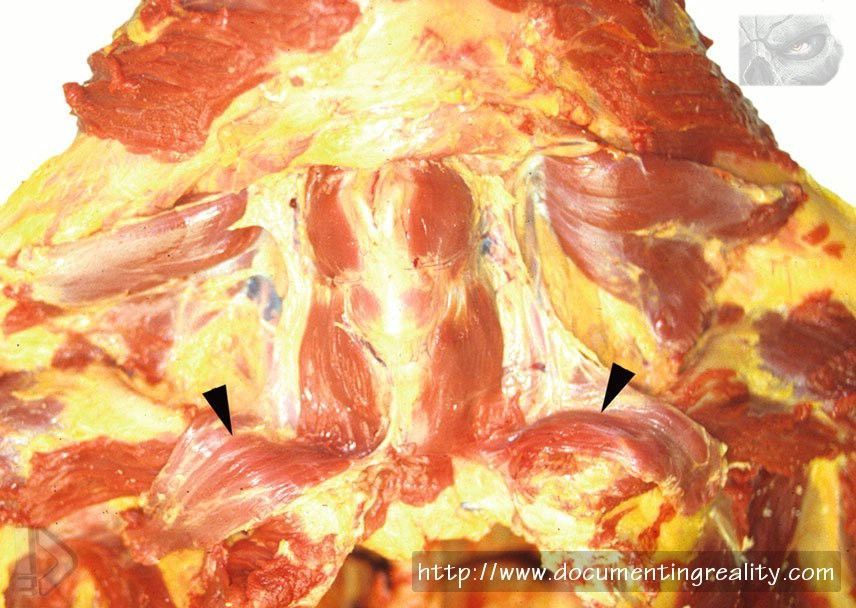 Fig. 7.67 Anterior neck dissection one level deeper than Fig. 66. The arrowheads indicate the reflected sternohyoid muscles 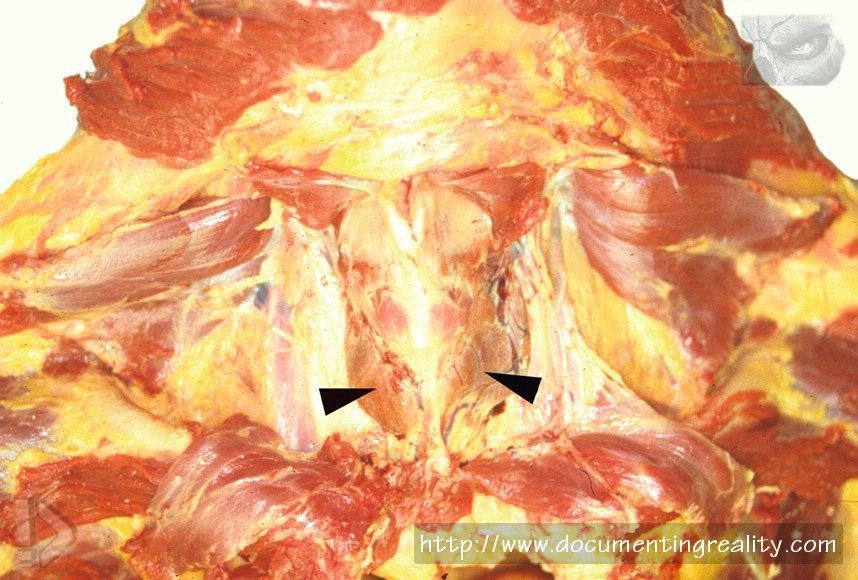 Fig. 7.68 Anterior neck dissection one level deeper than Fig. 67, revealing the thyroid gland overlying the larynx (arrowheads) 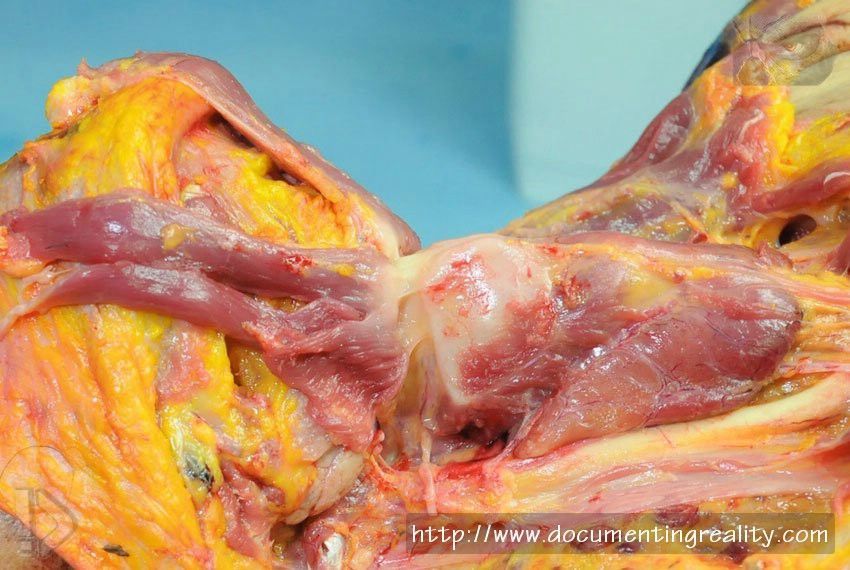 Fig. 7.69 A lateral view revealing the white thyroid cartilage forming the larynx, with the tan-colored thyroid gland below, wrapped around the tracheas (not visible) 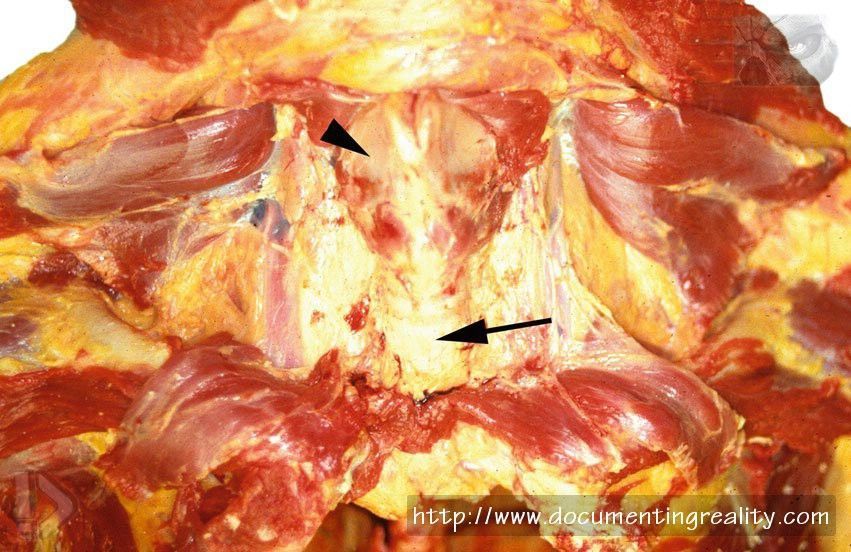 Fig. 7.70 A deeper level of a layer-by-layer anterior neck dissection revealing the thyroid cartilage (arrowhead) and trachea (arrow), after removal of the thyroid gland 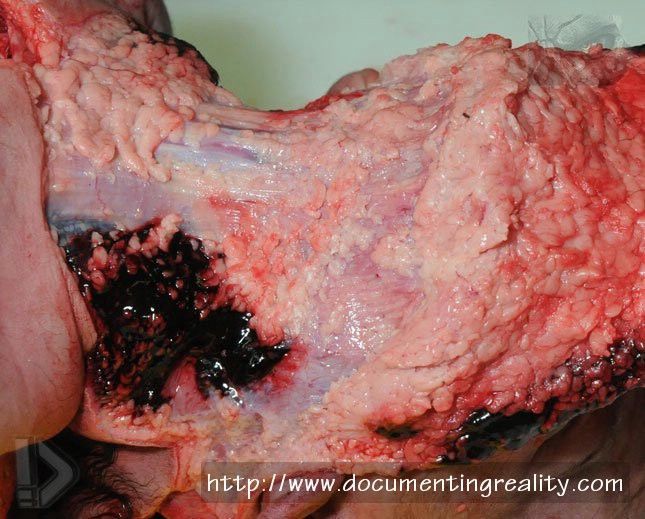 Fig. 7.71 Extensive bleeding of the side of the neck is due in this case to intravenous cannulation during attempted resuscitation, and not to blunt trauma 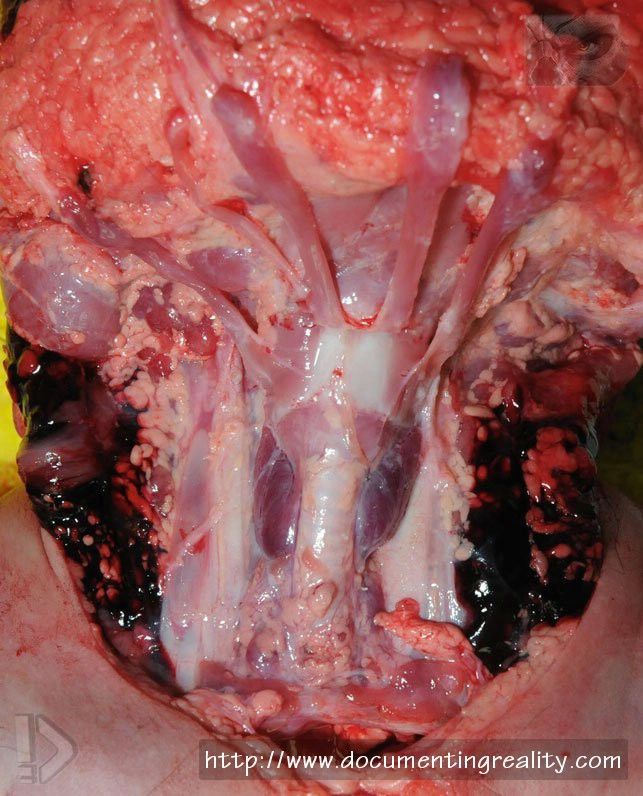 Fig. 7.72 Viewed from the front of the neck, symmetrical bleeding of the side of the neck, with no other bleeding, is most often due to medical intervention 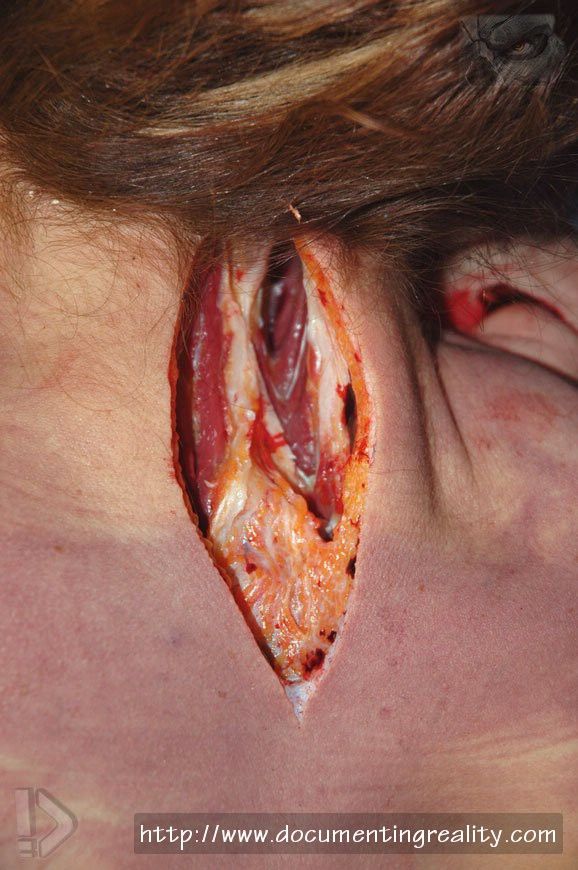 Fig. 7.73 A very limited posterior neck dissection to check for bruising  Fig. 7.74 Dissection of the lower extremity in order to identify deep venous thrombosis (arrows) in the setting of pulmonary thromboemboli  Fig. 7.75 Spinal cord removal via an anterior (front) approach using an oscillating saw to take off the front of the vertebral column. An alternative method involves removing the spinal cord from a posterior (back) approach 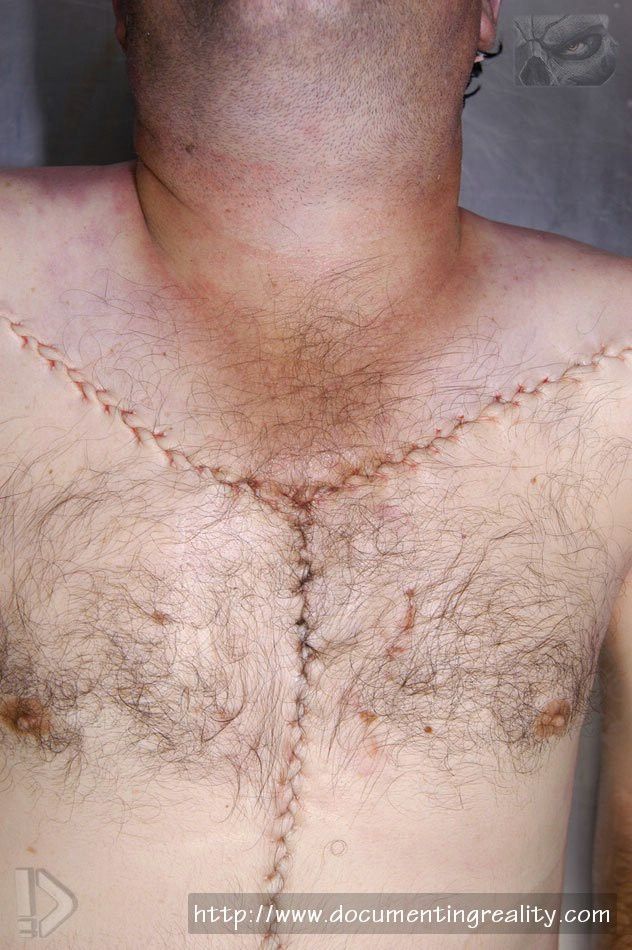 Fig. 7.76 A body following complete autopsy with a carefully sutured Y-shaped incision 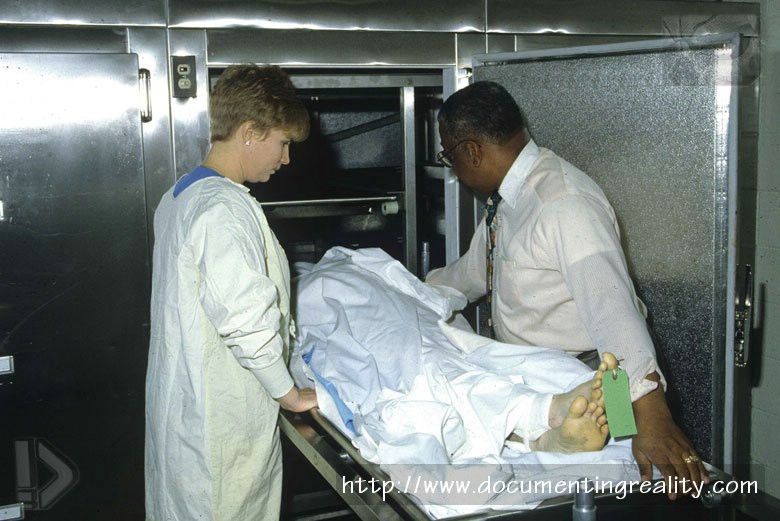 Fig. 7.77 Bodies are typically stored in freezing rooms or coolers prior to and after autopsy. Coolers can contain individual ‘‘drawers’’ or ‘‘shelves,’’ as shown, or be composed of large walk-in/roll-in units 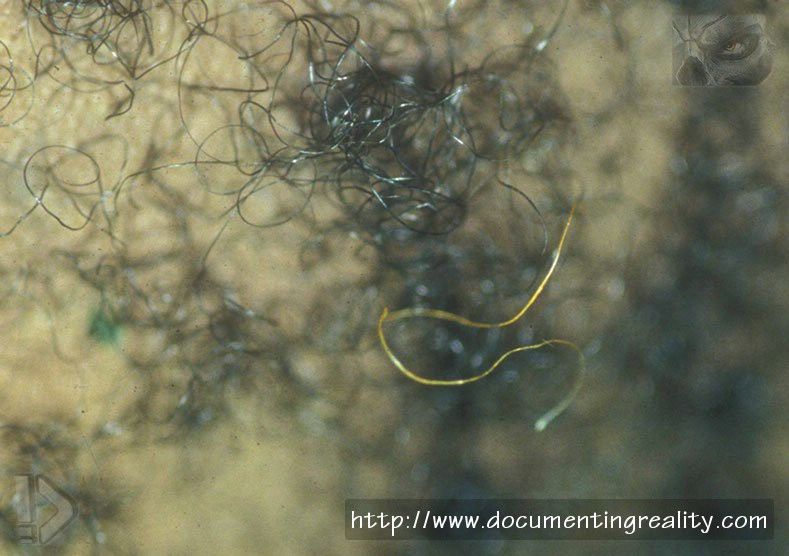 Fig. 7.78 A hair located within the hair of a homicide victim. The collection of such trace evidence may be extremely important, which is why hair at autopsy will be examined and combed in certain cases 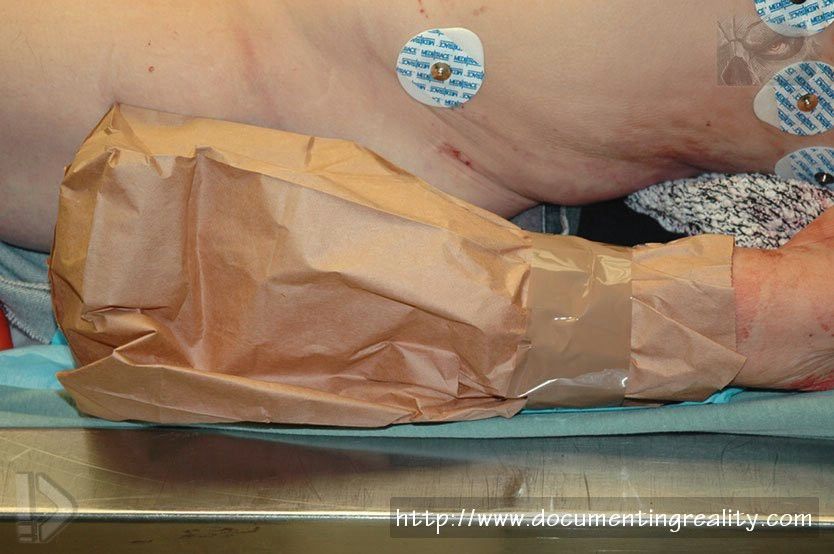 Fig. 7.79 In some cases, paper (not plastic) bags are placed over the hands at the death scene, in order to preserve any trace evidence that might be on the hands and/or fingers Source: The Atlas of Forensic Pathology for Police, Forensic Scientists, Attorneys and Death Investigators (2012)  References Adams VI. Autopsy technique for neck examination. I. Anterior and lateral compartments and tongue. Pathol Annu. 1990;25(pt 2):331–49. Adams VI. Autopsy technique for neck examination. II. Vertebral column and posterior compartment. Pathol Annu. 1991;26(pt 1):211–26. Forensic Autopsy Performance Standards. National Association of Medical Examiners. Inspection and Accreditation Policy and ProcedureManual, Accreditation Forms, and Checklist. National Association ofMedical Examiners. Ludwig J. Handbook of autopsy practice. 3rd ed. Totowa: Humana Press; 2002. Peterson GF, Clark SC. Forensic autopsy performance standards. Am J Forensic Med Pathol. 2006;27:200–55. Prahlow JA. Chapter 3 – hospital versus medicolegal (forensic) autopsies. In: Prahlow JA, editor. Basic competencies in forensic pathology – a forensic pathology primer.Northfield: College of American Pathologists; 2006a. p. 5–14. Prahlow JA. Chapter 6 – medicolegal autopsies: an overview. In: Prahlow JA, editor. Basic competencies in forensic pathology – a forensic pathology primer. Northfield: College of American Pathologists; 2006b. p. 33–6. Sheaff MT, Hopster DJ. Post mortem technique handbook. 2nd ed. New York: Springer; 2004. |
|
#3
●
04-27-2014, 02:08 AM
| ||||||||
| ♚ Legacy Gold Member ♚ Poster Rank:195 Female Join Date: Nov 2009 Posts: 7,761 Mentioned: 5 Post(s) Quoted: 708 Post(s)
| ||||||||
|
Re: The Forensic Examination and Autopsy
Great post. I love stuff like this. |
|
#4
●
04-27-2014, 02:38 AM
| ||||||||
| My Rank: MASTER SERGEANT Poster Rank:511 Let's go Brandon Join Date: Aug 2013 Posts: 2,021 Mentioned: 14 Post(s) Quoted: 1172 Post(s)
| ||||||||
|
Re: The Forensic Examination and Autopsy
I will never eat spare ribs again! |
|
#5
●
04-27-2014, 03:09 AM
| ||||||||
| My Rank: MASTER SERGEANT Poster Rank:560 Male can only be one of two Join Date: May 2009 Posts: 1,748 Mentioned: 2 Post(s) Quoted: 257 Post(s)
| ||||||||
|
Re: The Forensic Examination and Autopsy
fucking hell, why did i look at this when im eating my breakfast, i feel sick as a dog now |


